How to Speed Up Your WordPress Website
It is essential to speed up your WordPress website to comply with google’s search engine requirements.
Google requires that a website loads fast enough to provide a good user experience.
Most websites and blogs rely on google search engines to freely be found online.
Otherwise, they need to rely on paid ads and other means to promote their business.
Therefore speed is critical for the success of today’s websites.
In this article, you’ll learn how to set up your WordPress website to make it load faster at Google’s required speed.
Without spending extra money on paid plugins or expensive hosting plans.
Disclosure: This page contains affiliate links, meaning we get a commission if you use those links. – You can read our full disclosure in our privacy policy.
Why You Should Speed Up Your Website?
If your final goal is to get more visitors to your website, then – Yes, you should.
Because, even with other promoting venus, if your website is not loading fast enough to satisfy your site’s visitors, it may not succeed.
Here are two of the main reasons why you need to make sure your website loads fast:
Users Don’t Wait For Too Long
Most internet users do not wait more than 3 seconds for a webpage to load.
As a matter of fact, 40% of them leave the site to go somewhere else if the website page they are waiting for takes longer than that to load.
Speed Affects Ranking Results
Not only will people leave your site before it even shows its first sentence.
But also, your Google ranking will suffer because Google rewards pages that load fast.
As you can see, having a fast-loading website is a must for today’s businesses and bloggers.
4 Steps to Speed Up Your WordPress Website
My website it’s built with WordPress and hosted on a shared hosting service plan with no CDN.
It’s a combination of two websites, the one you are on now and its counterpart in Spanish.
Each with its own respective blog.
So how did I get it to load in less than two seconds?
There were only four simple steps I did take to make my website load fast.
Let me show you what they are and how you can quickly implement them on your site.
But, before you jump into working on this task to speed up your site, you need to find out if your website is slow loading or not.
Test your website’s loading speed
There are several websites where you can test your website speed for free to find out if it is slow loading or not.
Do this first because you might not even have that problem at all.
If you want to test the speed of several pages at the same time, use EXPERTE; this tool will give you the speed results of all the pages and posts on your website at once, kind of in a “Bulk Page Speed Test”.
Keep in mind that if your website has a lot of pages, it will take some time for the tool to go over all of it.
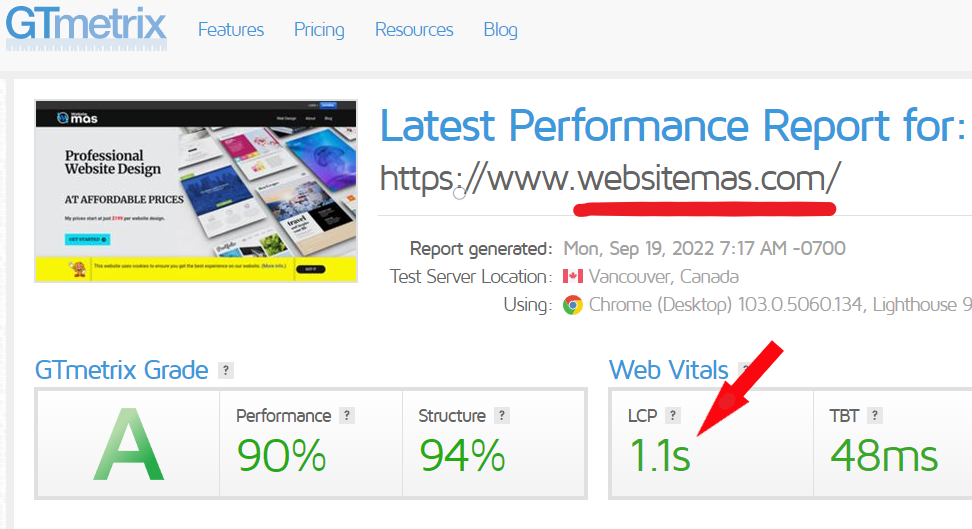
The other two free tools I use are GTmetrix and Pingdom.
I do like all three of them, and I do use them at the same time to have more information on the speed results of the website I’m testing.
So, head over to either one of them, enter your website’s URL, and wait for the results.
For this test, you only need to pay attention to the load time (LCP – Largest Contentful Paint).
The best loading time should be less than 2 seconds and no more than 3 seconds.
So, if your website takes longer than 3 seconds to load, it means that there are a few things you need to correct.

Always test more than once on any of the speed tools on this post to have the final results since many variants affect your website’s speed.
How to Make Your Website Load Faster
If it happens to be that your website has a slow loading, then it’s time to start working on fixing things up to make it faster.
On GTmetrix and Pingdom testing pages, when you scroll down after the results, you’ll notice some suggestions to implement on your website to make it load faster.
Some of the common ones are:
In this article, I’m not going into detail about each of them; I will only focus on telling you what to do to fix it.
But, if you are curious and want to know more details about what all of those offenders are, I recommend you read these articles:
- https://kinsta.com/blog/eliminate-render-blocking-javascript-css/
- https://www.keycdn.com/blog/remove-unused-css
- https://kinsta.com/blog/ttfb/
So, let’s begin with the steps.
Step 1 – Make a Full Back Up of Your Website
Before you do anything, the first thing you need to do is a full backup of your website.
I strongly suggest you do that, just in case something goes wrong.
With that in mind, let me do the following disclaimer:
Please keep in mind that this is a tutorial based on my own experience with my own website, and even though everything worked fine on my site, it does not necessarily mean it will work the same way on yours.
In other words, proceed at your own risk; I’m not responsible if something goes wrong with your website when you apply my suggestions.
And, with that out of the way.
Here are my website’s details at the time of writing this post – for you to compare with what you have:
- Hosting. – InMotion shared plan.
- Theme. – Authority Pro, from StudioPress.
- Plugins. – And 14 free plugins.
Step 2 – Install Autoptimize Plugin to Optimize Resources
So, once you’ve done your website’s backup, it is now time to start speeding up your WordPress website.
Let’s begin by eliminating these two issues, Render-blocking Resources, and Unused CSS.
To do that, you need to install and set up the Autoptimize free plugin created by Frank Goossens.
JS, CSS & HTML Tab
Once installed and activated, head over to the Autoptimize plugin settings and to the JS, CSS & HTML tabs.
On the JavaScript Options section, check the following options:
- Optimize JavaScript Code?
And leave the rest blank.
On the CSS Options section, check the following options:
- Optimize CSS Code?
- Aggregate CSS-files?
- Also, aggregate inline CSS?
Do not change anything on: Exclude CSS from Autoptimize.
And leave the rest blank.
On the HTML Options section, check the following option:
- Optimize HTML Code?
And leave the other one blank.
Skip the CDN Options and Cache Info sections.
On the Misc Options section, check the following options:
- Save aggregated script/CSS as static files?
- Minify excluded CSS and JS files?
- Disable extra compatibility logic?
Leave the rest blank and click on the Save Changes and Empty Cache button.
Images Tab
Now head over to the Images tab; on the Image optimization section, check on the following option:
- Lazy-load images?
And leave the other one blank.
Now click on the Save Changes button.
Extra Tab
Lastly, head over to the Extra tab; on the Extra Auto-Optimizations section, check on the following options:
- Leave it as is.
- Remove emojis.
- Remove query strings from static resources.
And leave the rest blank.
Click on the Save Changes button.
With this, you conclude the settings set up for the Autoptimize plugin.
Step 3 – Install WP-Optimize Plugin to Reduce TTFB
Reducing Server Response Times (TTFB)
Excessive time to the first byte is mostly always caused by the way WordPress serves web pages (known as Dynamic).
To view your website’s actual TTFB, scroll down on the GTmetrix results page.
Here, you only need to pay attention to the First Byte results; ideally, it should be less than 500ms.
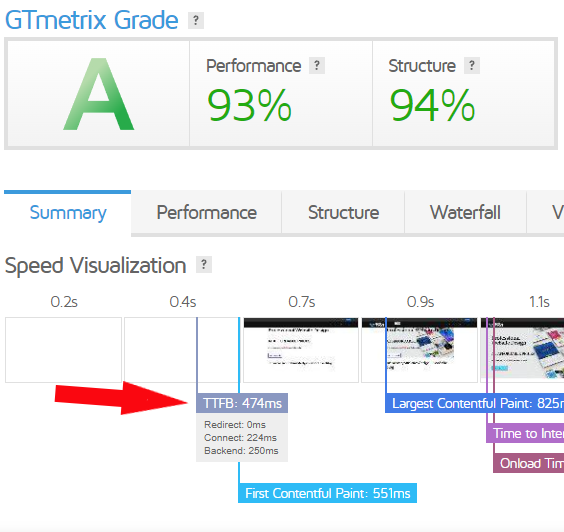
If your TTFB is higher than 500ms, you need to lower it.
So, for you to resolve this issue, you need to install and set up the WP-Optimize plugin created by David Anderson, Ruhani Rabin, Team Updraft.
It has a free and paid version; I’m using the free version in this tutorial.
Once installed and activated, head over to your WordPress Dashboard’s left sidebar and find the WP-Optimize tab; hover over it and click on the Cache link.
Page Cache Tab
Here on the Page Cache Tab, you are going to set the following settings:
- Enable page caching.
- Purge the cache – Yes, click on the Purge cache button once.
On the Cache settings, I have the lifespan set at 1 month.
It is up to you if you want to set it up for more than that, but I wouldn’t do it for less than 24 hours.
And leave the rest blank.
Click on the Save changes button.
Now head over to the Preload Tab and do the following:
- Preload now – Yes, click on the Run now button once.
Schedule preloader
- Check the Schedule preloader.
- Select schedule type – Set it to the Same as cache lifespan.
And click on the Save changes button.
With this, you conclude the settings set up for the WP-Optimize – Clean, Compress, Cache plugin.
Step 4 – Optimize Your Website’s Images
There are several suitable image formats for websites, PNG, JPG, and the new kid on the block, WebP, also called next-gen images.
I’m not using next-gen formatted images in my blog, just regular PNG and JPG formatted pictures.
Next-gen pictures have superior compression characteristics compared to their older JPEG and PNG; therefore, they are less bulky.
They will load faster on a browser, reducing the website loading time.
The problem with next-gen images is that a few browsers still don’t support them when writing this post.
Therefore, I’m not using them for now.
Reducing Your Images Size for Fast Loading
So, to help my blog load images faster, I did reduce their size using the tool; RIOT image optimizer.
It is a free tool for Windows; I don’t know if they have a Mac version, but you can use GIMP for this task, and it is also a free tool.
These tools reduce the size of your images by taking off pixels from them.
Keep in mind that by doing this, your images not only become less heavy but less sharp as well.
I try to make them between 10-60kb, depending on how the picture looks. It takes a little work, but it’s worth it.
If you don’t want to lose the quality of your images, this will not work for you.
You might need to do some research to find another way to reduce their size without losing quality.
Conclusion
And that’s pretty much all I did to make my website and blog load fast.
As you can see, by only using free plugins and reducing the images’ size, it is possible to achieve fast loading on a WordPress website.
Even if you are hosting your WordPress website on a shared host as I do.
So, make your website faster to please your visitors and comply with Google requirements.
But just don’t go crazy about it; one or two seconds over will not hurt your site.
I hope this has helped you 🙂
If you need help with your website’s design, check my web design prices here.
Or DIY by following my guide: How To Create My Own Website For My Business.